Capture images and stream video from Raspberry Pi cameras using rpicam-apps and OpenCV. Perfect for computer vision, surveillance, and image processing applications.
Overview
The hardware-camera skill provides comprehensive camera control for Raspberry Pi Camera modules. Built on rpicam-apps and OpenCV, it offers high-quality image capture, video streaming, and frame processing capabilities ideal for computer vision projects.
Features
- Image Capture - High-resolution photo capture
- Video Streaming - Real-time video feed
- Frame Processing - OpenCV integration
- Multiple Resolutions - From 640x480 to 4608x2592
- Camera Controls - Exposure, brightness, contrast
- Format Support - JPEG, PNG, RAW
- Preview Mode - Live preview before capture
Prerequisites
- Raspberry Pi Camera Module (v1, v2, v3, or HQ)
- Camera enabled in raspi-config
- rpicam-apps installed
- User in
videogroup - Camera connected to CSI port
Usage
Basic Commands
# Capture image
/hardware-camera capture --output photo.jpg

# Capture with specific resolution
/hardware-camera capture --output image.jpg --resolution 1920x1080

# Record video
/hardware-camera record --output video.mp4 --duration 10

# Take photo with preview
/hardware-camera capture --output photo.jpg --preview 5

# List camera information
/hardware-camera info
Advanced Options
# Capture with custom settings
/hardware-camera capture \
  --output photo.jpg \
  --resolution 4608x2592 \
  --quality 95 \
  --exposure auto \
  --brightness 50

# Record video with settings
/hardware-camera record \
  --output video.h264 \
  --duration 30 \
  --framerate 30 \
  --bitrate 10000000

# Time-lapse capture
/hardware-camera timelapse \
  --output timelapse_%04d.jpg \
  --interval 5 \
  --count 100

# Stream video
/hardware-camera stream --port 8000
Python API
Basic Capture
from distiller_sdk import Camera

# Initialize camera
camera = Camera()

# Capture image
camera.capture("photo.jpg")

# Capture with resolution
camera.capture("photo.jpg", resolution=(1920, 1080))

# Capture to buffer
image_data = camera.capture_to_buffer()
Video Recording
from distiller_sdk import Camera

camera = Camera()

# Record video
camera.record("video.mp4", duration=10)

# Record with settings
camera.record(
    "video.mp4",
    duration=30,
    framerate=30,
    resolution=(1920, 1080)
)
Video Streaming
from distiller_sdk import Camera
import cv2

camera = Camera()

# Start streaming
stream = camera.start_stream()

try:
    for frame in stream:
        # Process frame with OpenCV
        gray = cv2.cvtColor(frame, cv2.COLOR_BGR2GRAY)

        # Display or process
        cv2.imshow('Camera', gray)

        if cv2.waitKey(1) & 0xFF == ord('q'):
            break
finally:
    camera.stop_stream()
    cv2.destroyAllWindows()
Advanced Configuration
from distiller_sdk import Camera, CameraConfig

# Configure camera
config = CameraConfig(
    resolution=(1920, 1080),
    framerate=30,
    brightness=50,        # 0-100
    contrast=50,          # 0-100
    saturation=50,        # 0-100
    sharpness=50,         # 0-100
    exposure_mode="auto", # auto, manual, night, sports
    white_balance="auto", # auto, incandescent, fluorescent, daylight
    rotation=0,           # 0, 90, 180, 270
    hflip=False,
    vflip=False
)

camera = Camera(config)
camera.capture("photo.jpg")
Camera Modes
Still Capture
from distiller_sdk import Camera

camera = Camera(resolution=(4608, 2592))  # Max resolution

# High quality capture
camera.capture("high_res.jpg", quality=100)

# Fast capture
camera.capture("quick.jpg", quality=75, encoding_speed="fast")
Video Mode
from distiller_sdk import Camera

camera = Camera(
    resolution=(1920, 1080),
    framerate=30
)

# Standard recording
camera.record("video.mp4", duration=60)

# High bitrate
camera.record("video.h264", duration=60, bitrate=20000000)
Time-Lapse
from distiller_sdk import Camera
import time

camera = Camera(resolution=(1920, 1080))

# Capture every 5 seconds for 100 frames
for i in range(100):
    camera.capture(f"frame_{i:04d}.jpg")
    time.sleep(5)

# Or use built-in timelapse
camera.timelapse(
    output_pattern="timelapse_%04d.jpg",
    interval=5,
    count=100
)
Live Preview
from distiller_sdk import Camera

camera = Camera()

# Show preview for 5 seconds then capture
camera.preview(duration=5)
camera.capture("photo.jpg")
OpenCV Integration
Basic Frame Processing
from distiller_sdk import Camera
import cv2

camera = Camera()

# Capture and process
frame = camera.capture_frame()

# Convert to grayscale
gray = cv2.cvtColor(frame, cv2.COLOR_BGR2GRAY)

# Detect faces
face_cascade = cv2.CascadeClassifier(cv2.data.haarcascades + 'haarcascade_frontalface_default.xml')
faces = face_cascade.detectMultiScale(gray, 1.1, 4)

# Draw rectangles
for (x, y, w, h) in faces:
    cv2.rectangle(frame, (x, y), (x+w, y+h), (255, 0, 0), 2)

# Save result
cv2.imwrite("faces_detected.jpg", frame)
Real-Time Processing
from distiller_sdk import Camera
import cv2

camera = Camera()
stream = camera.start_stream()

while True:
    frame = next(stream)

    # Edge detection
    edges = cv2.Canny(frame, 100, 200)

    # Display
    cv2.imshow('Edges', edges)

    if cv2.waitKey(1) & 0xFF == ord('q'):
        break

camera.stop_stream()
cv2.destroyAllWindows()
Motion Detection
from distiller_sdk import Camera
import cv2

camera = Camera()
stream = camera.start_stream()

prev_frame = None

while True:
    frame = next(stream)
    gray = cv2.cvtColor(frame, cv2.COLOR_BGR2GRAY)
    gray = cv2.GaussianBlur(gray, (21, 21), 0)

    if prev_frame is None:
        prev_frame = gray
        continue

    # Compute difference
    frame_delta = cv2.absdiff(prev_frame, gray)
    thresh = cv2.threshold(frame_delta, 25, 255, cv2.THRESH_BINARY)[1]
    thresh = cv2.dilate(thresh, None, iterations=2)

    # Find contours
    contours, _ = cv2.findContours(thresh.copy(), cv2.RETR_EXTERNAL, cv2.CHAIN_APPROX_SIMPLE)

    motion_detected = False
    for contour in contours:
        if cv2.contourArea(contour) > 500:
            motion_detected = True
            (x, y, w, h) = cv2.boundingRect(contour)
            cv2.rectangle(frame, (x, y), (x+w, y+h), (0, 255, 0), 2)

    if motion_detected:
        print("Motion detected!")

    cv2.imshow('Motion Detection', frame)
    prev_frame = gray

    if cv2.waitKey(1) & 0xFF == ord('q'):
        break

camera.stop_stream()
cv2.destroyAllWindows()
Camera Controls
Exposure Control
from distiller_sdk import Camera

camera = Camera()

# Auto exposure
camera.set_exposure_mode("auto")

# Manual exposure
camera.set_exposure_mode("manual")
camera.set_exposure_time(30000)  # microseconds

# Scene modes
camera.set_exposure_mode("night")    # Low light
camera.set_exposure_mode("sports")   # Fast motion
camera.set_exposure_mode("backlight") # Backlit scenes
White Balance
from distiller_sdk import Camera

camera = Camera()

# Auto white balance
camera.set_white_balance("auto")

# Manual white balance
camera.set_white_balance("incandescent")  # Indoor lighting
camera.set_white_balance("fluorescent")   # Office lighting
camera.set_white_balance("daylight")      # Outdoor
camera.set_white_balance("cloudy")        # Overcast
Image Adjustments
from distiller_sdk import Camera

camera = Camera()

# Brightness (0-100)
camera.set_brightness(60)

# Contrast (0-100)
camera.set_contrast(50)

# Saturation (0-100)
camera.set_saturation(50)

# Sharpness (0-100)
camera.set_sharpness(50)
Rotation and Flip
from distiller_sdk import Camera

camera = Camera()

# Rotate
camera.set_rotation(180)  # 0, 90, 180, 270

# Flip
camera.set_hflip(True)    # Horizontal flip
camera.set_vflip(True)    # Vertical flip
Resolution Support
Camera Module v3
| Resolution | Aspect | Use Case |
|---|---|---|
| 4608x2592 | 16 | Maximum still |
| 2304x1296 | 16 | High-res video |
| 1920x1080 | 16 | Full HD video |
| 1280x720 | 16 | HD video |
| 640x480 | 4 | Preview/streaming |
Camera Module v2
| Resolution | Aspect | Use Case |
|---|---|---|
| 3280x2464 | 4 | Maximum still |
| 1920x1080 | 16 | Full HD video |
| 1280x720 | 16 | HD video |
| 640x480 | 4 | Preview/streaming |
Technical Details
Performance
| Resolution | FPS | CPU Usage | Use Case |
|---|---|---|---|
| 640x480 | 90 | 15% | Fast processing |
| 1280x720 | 60 | 25% | HD streaming |
| 1920x1080 | 30 | 35% | Full HD video |
| 4608x2592 | 10 | 50% | High-res photos |
Latency
- Still capture: 1-2 seconds
- Video start: 2-3 seconds
- Frame grab: 30-50ms
- Stream processing: 33ms (30fps)
Storage Requirements
- JPEG (1920x1080): ~1-2MB per image
- JPEG (4608x2592): ~4-6MB per image
- H.264 Video (1080p30): ~10MB per minute
- RAW (4608x2592): ~15MB per image
Use Cases
Surveillance Camera
from distiller_sdk import Camera
import cv2
import datetime

camera = Camera(resolution=(1920, 1080))
stream = camera.start_stream()

motion_detected = False
recording = False
video_writer = None

while True:
    frame = next(stream)

    # Motion detection logic
    if detect_motion(frame):
        if not recording:
            # Start recording
            timestamp = datetime.datetime.now().strftime("%Y%m%d_%H%M%S")
            filename = f"motion_{timestamp}.mp4"

            fourcc = cv2.VideoWriter_fourcc(*'mp4v')
            video_writer = cv2.VideoWriter(filename, fourcc, 30, (1920, 1080))
            recording = True
            print(f"Recording started: {filename}")

    if recording:
        video_writer.write(frame)

        # Stop after 30 seconds of no motion
        if not detect_motion(frame):
            no_motion_count += 1
            if no_motion_count > 900:  # 30 seconds at 30fps
                video_writer.release()
                recording = False
                print("Recording stopped")
QR Code Scanner
from distiller_sdk import Camera
import cv2
from pyzbar import pyzbar

camera = Camera()
stream = camera.start_stream()

print("Scanning for QR codes...")

while True:
    frame = next(stream)

    # Decode QR codes
    barcodes = pyzbar.decode(frame)

    for barcode in barcodes:
        # Extract data
        data = barcode.data.decode("utf-8")
        barcode_type = barcode.type

        print(f"Found {barcode_type}: {data}")

        # Draw rectangle
        (x, y, w, h) = barcode.rect
        cv2.rectangle(frame, (x, y), (x+w, y+h), (0, 255, 0), 2)

    cv2.imshow("QR Scanner", frame)

    if cv2.waitKey(1) & 0xFF == ord('q'):
        break

camera.stop_stream()
cv2.destroyAllWindows()
Photo Booth
from distiller_sdk import Camera, LED, AudioPlayer
import time

camera = Camera(resolution=(1920, 1080))
led = LED.create_led_with_sudo(0)
audio = AudioPlayer()

def take_photo():
    print("Get ready!")
    audio.play("countdown.wav")

    # Countdown
    for i in range(3, 0, -1):
        print(f"{i}...")
        led.set_color(255, 255, 0)  # Yellow
        time.sleep(0.5)
        led.off()
        time.sleep(0.5)

    # Capture
    led.set_color(255, 255, 255)  # White flash
    timestamp = time.strftime("%Y%m%d_%H%M%S")
    camera.capture(f"photo_{timestamp}.jpg")
    led.off()

    audio.play("shutter.wav")
    print("Photo captured!")

# Take photo
take_photo()
Troubleshooting
Camera Not Detected
# Check camera connection
vcgencmd get_camera

# Should output: supported=1 detected=1

# Enable camera
sudo raspi-config
# Navigate to Interface Options > Camera > Enable

# Check for errors
dmesg | grep -i camera

# Verify user permissions
groups  # Should include 'video'
Poor Image Quality
# Use maximum resolution
camera = Camera(resolution=(4608, 2592))

# Increase quality setting
camera.capture("photo.jpg", quality=100)

# Adjust image settings
camera.set_sharpness(60)
camera.set_contrast(55)

# Ensure good lighting
camera.set_exposure_mode("auto")
Low Frame Rate
# Reduce resolution
/hardware-camera stream --resolution 1280x720

# Lower framerate requirement
/hardware-camera record --framerate 24

# Check CPU usage
htop

# Close other applications
Camera Lag/Delay
# Reduce buffer size
camera = Camera(buffer_count=1)

# Use lower resolution
camera = Camera(resolution=(1280, 720))

# Reduce processing
# Process every Nth frame instead of every frame
Best Practices
- Enable camera in raspi-config - Required before use
- Check lighting - Good lighting improves quality
- Use appropriate resolution - Balance quality vs performance
- Handle resources - Always stop streams when done
- Error handling - Check return values
- Thermal management - Monitor temperature during extended use
- Storage management - Monitor disk space for video recording
Hardware Setup
Camera Connection
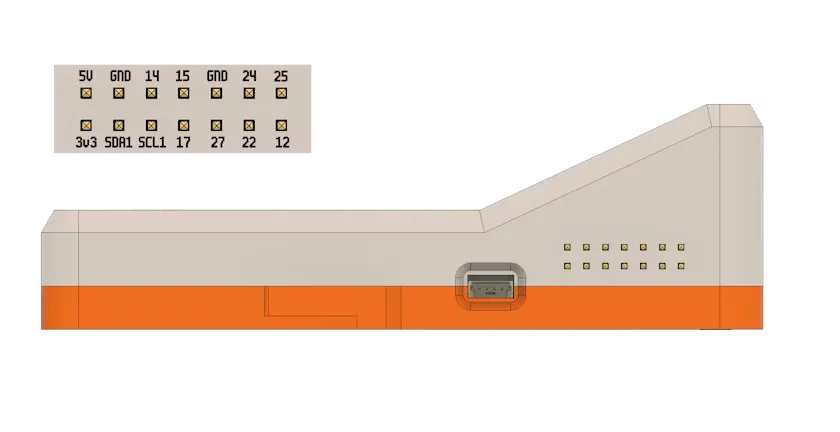
- Power off Raspberry Pi
- Locate camera CSI connector
- Gently pull up on connector tabs
- Insert camera ribbon cable (blue side facing Ethernet port)
- Push tabs down to secure
- Power on Raspberry Pi
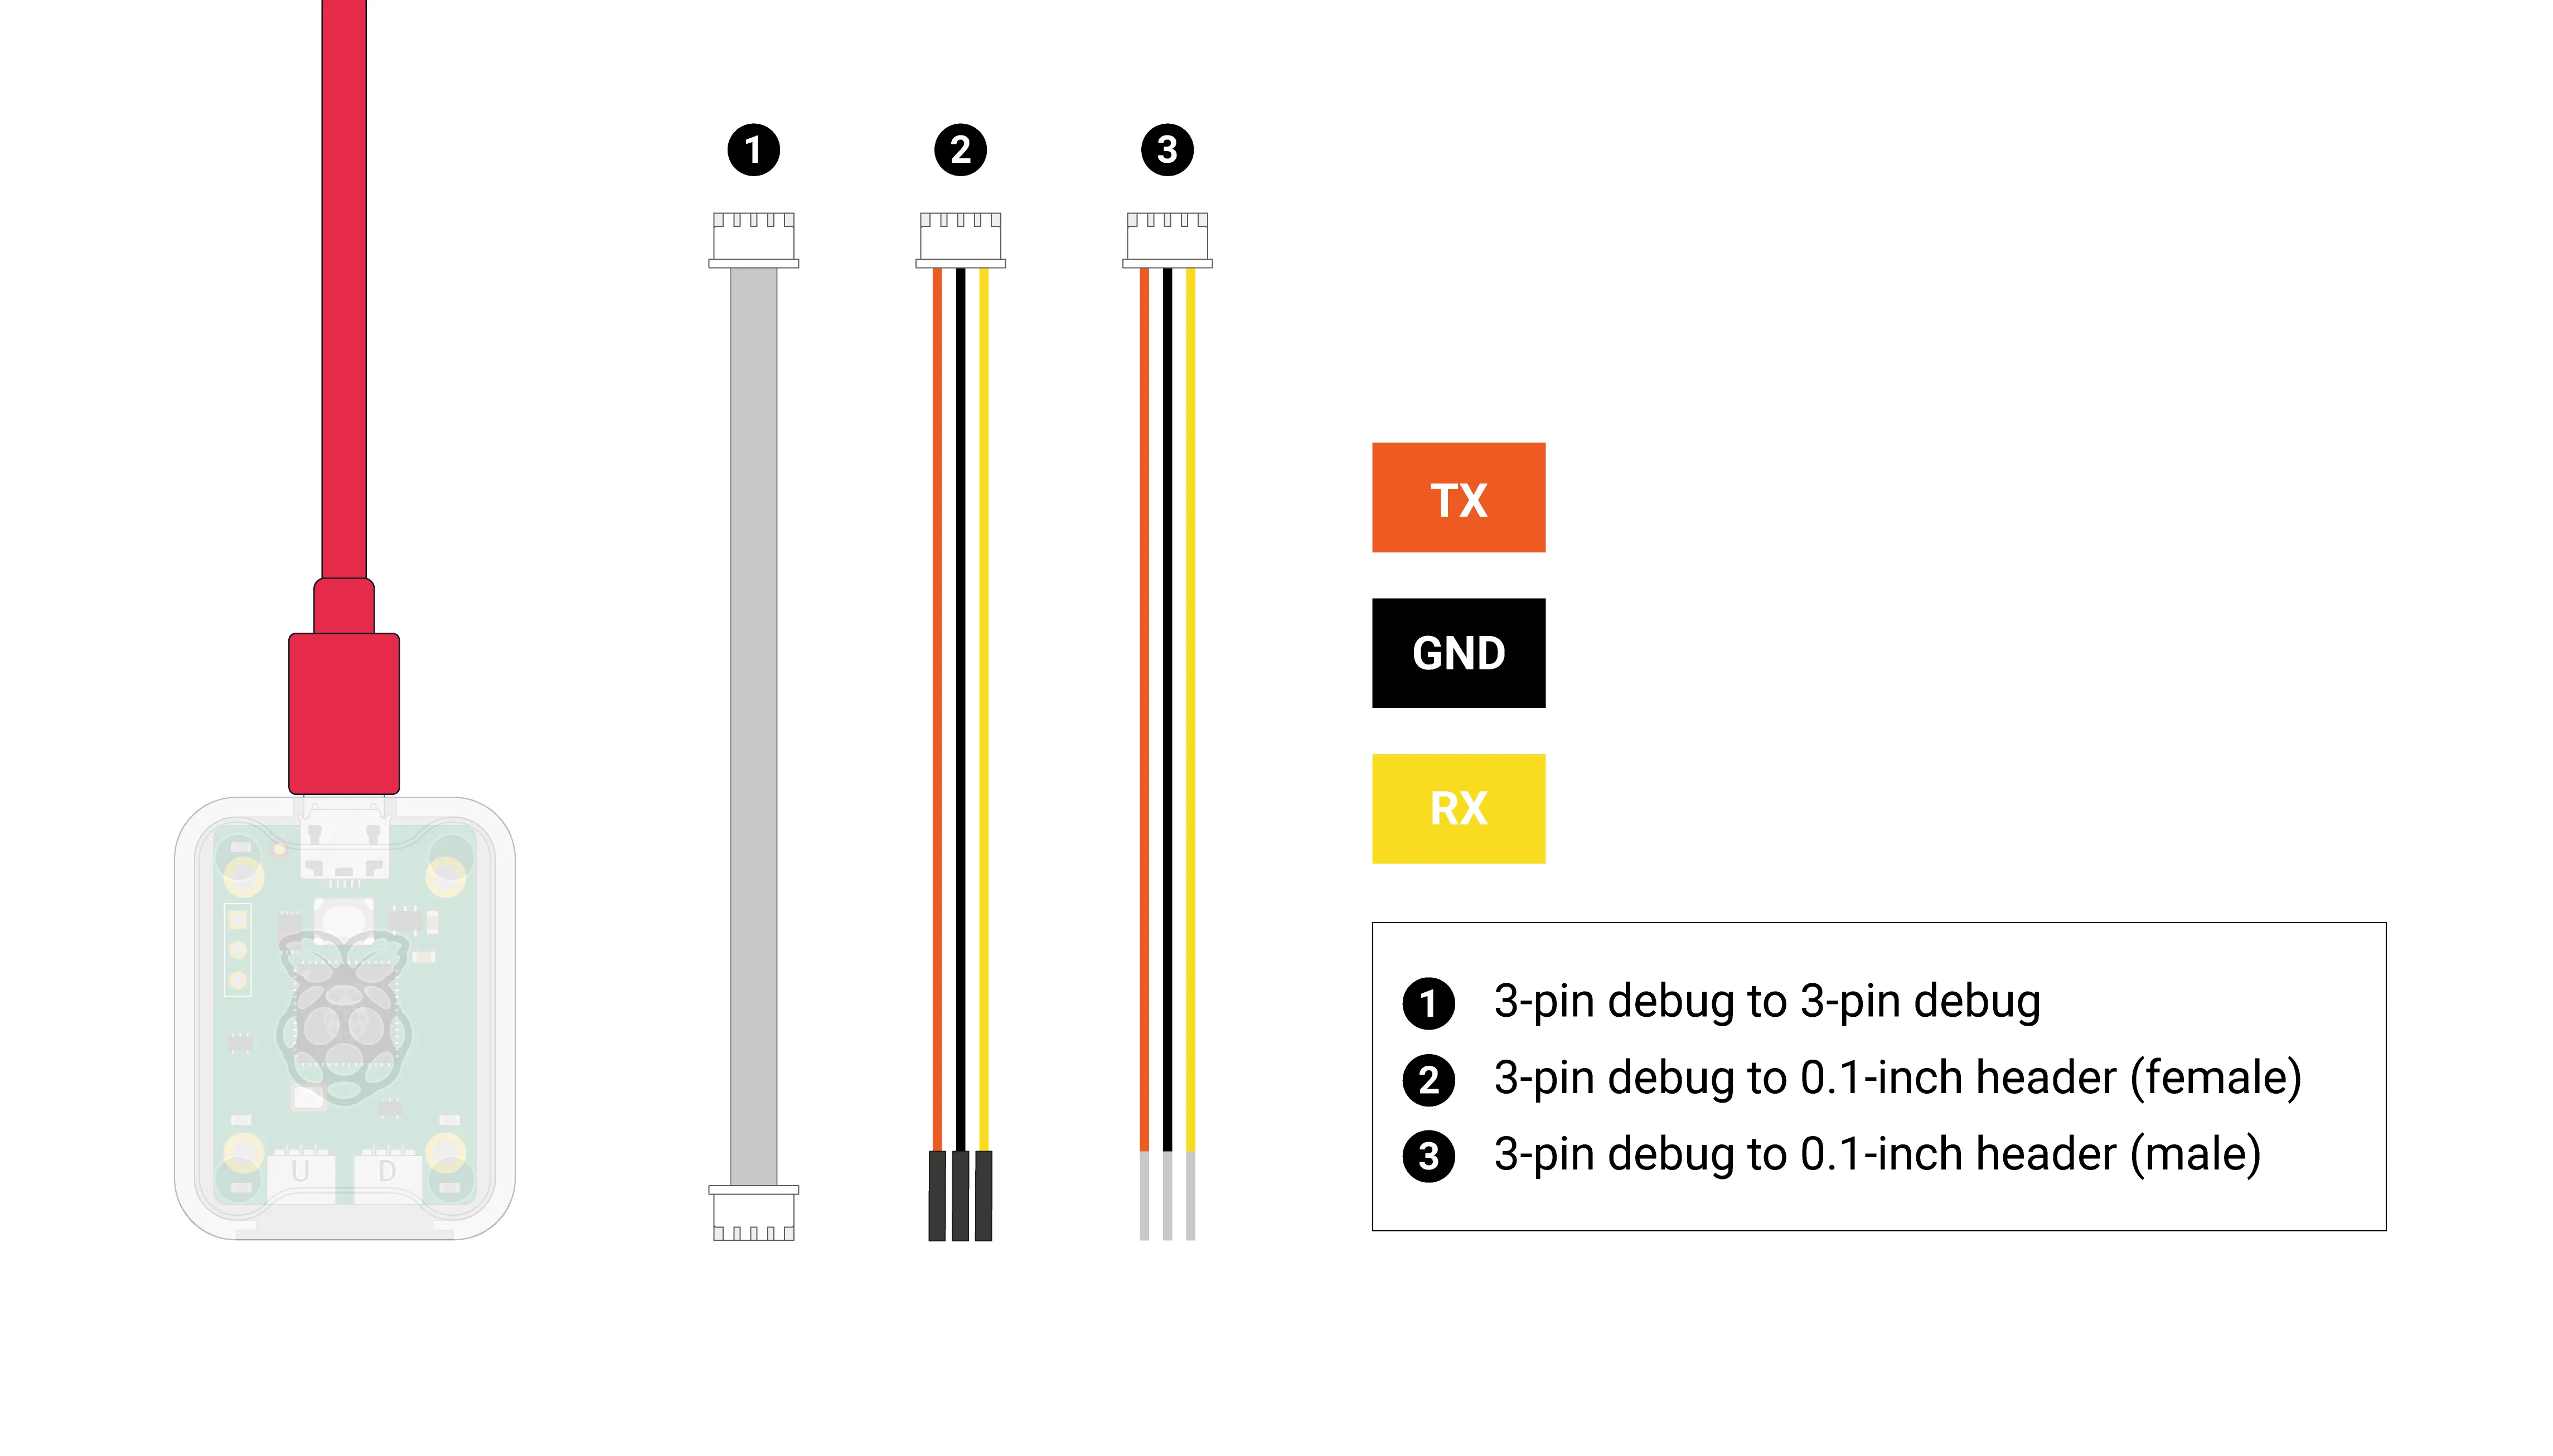
For advanced debugging and development, you can use the Raspberry Pi Debug Probe for serial console access:
Camera Modules
Camera Module v3 (Recommended)
- 12MP Sony IMX708 sensor
- Autofocus
- HDR support
- Better low-light performance
Camera Module v2
- 8MP Sony IMX219 sensor
- Fixed focus
- Good general purpose
HQ Camera
- 12MP Sony IMX477 sensor
- C/CS mount for lenses
- Best image quality
- Requires lens
See Also
- system-verification - Verify camera hardware
- distiller-troubleshooting - Debug camera issues
- hardware-led - Visual indicators for camera operations